You know how when you go shopping and you buy something, the store packs your new goodies in a bag with tissue paper to make it look extra nice? But then you get home and you probably throw out the bag and the tissue paper and just keep the stuff you bought. Such a waste, right? Well, not anymore!! Take your used tissue wrappings from your fancy purchases and transform them into snazzy decor, a honeycomb tissue paper pouf!!
I made this little pouf all with tissue paper I already had from various purchases that I kept for some unknown reason. I didn't have to buy one thing for this project which is awesome, you probably have all of these items in your home as well if you are a bit crafty. And now for a tutorial!
You will need: Assorted tissue paper, some sheets of card stock or thin cardboard (a cereal box will do), a compass or large circle template, scissors, a fresh glue stick, a needle, and some thread.
I had a rad toile de jouy tissue paper that I don't even know where I got along with some neon salmon geometric paper and some cream/mint printed tissue paper. Once you gathered your tissue paper draw a circle on your card stock the size you want your pouf to be. It's easier to start with a mid size circle (you can try a giant or tiny one once you're familiar with the basics). I made mine about 5 1/2". Cut the circle out and then cut it in half.
Cut out rectangles of your tissue paper a little bigger than the size of your half circle. Using an olfa blade, square ruler, and cutting board is the easy way to go. The more uniform your cut pieces the better.
For my pouf I used 45 pieces. You can use more or less depending on how dense you want your pouf to be. Below are the 3 piles of cut tissue paper.
Now stack the pile however you want the pieces to go in your pouf. I did 5 of each pattern and rotated them until I had 45 in the stack. Feel free to experiment with this! It makes such different kind of poufs depending on how you pile the sheets.
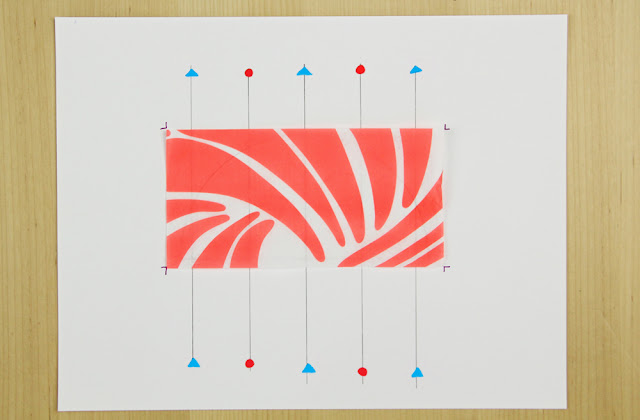
Now that your stack is ready to go take a scrap piece of paper and trace your half circle onto it. Draw vertical lines across the half circle that are equal lengths apart. These are the lines where you will alternate glue. The more lines you draw the smaller your honeycomb shapes will be and the less you draw the bigger they'll be. I drew 5 lines which I think is a good number for 4-6" poufs. Draw different colored shapes on alternating lines to make the process more clear.
Place your first square of tissue paper right over your drawn half circle so that it is centered. Draw marks on the corners by the tissue so you know where to keep it placed.
With your first piece of tissue placed, use a glue stick and connect only the blue triangle lines, making 3 vertical stripes of glue across the tissue paper. Place your second piece of tissue paper on top of the first piece and smooth down. On the top of this piece you will only glue where the red circle lines are. When you place the third piece you will glue along the blue triangle lines again and repeat this, alternating lines until you used all of your tissue pieces. Make sure the tissue stays within the marked corners you drew. It will take a little while.
Make sure to pay LOTS of attention to the alternating glue lines. If you skip a set your pouf will be totally messed up!! (how lame) All that work for nothing, so do your best to keep track.
When you're all done use your half circle template to cut your glued stack into a half circle, making sure to center it in the middle of your stack. Glue one card stock half circle to each side of your glued tissue stack.
Using a doubled thread sew through one corner of your half circle stack and back through the opposite corner. Knot the thread but leave at least 1.5" from where you sewed through since you will need the slack to fully open the pouf. Leave the thread long after the knot if you want to hang it up.
Now the fun part: OPEN YOUR POUF!!! Be gentle and pull it open slowly. How does it look? You can glue the card stock pieces together to keep it open forever or just use circles of tape, sticky side out to keep it open temporarily and close it later for storage.
Enjoy!!


so pretty
ReplyDeletethank you for the lovely images. I'll try this !x
ReplyDelete